One of the biggest obstacles in building your own camper van is the electrical system. Unless you are a professional and licensed electrician, it can be extremely daunting to tackle a job like this on your own. I will start by saying that if you do not feel comfortable in putting together your own system, by all means hire a professional and have it done for you. It can be extremely dangerous if you make mistakes as a faulty system can at the very least, fry your electrical components and at the extreme end, cause injury and death.
And I have to say this, I am not a professional electrician. This post contains my educated opinion from my own experiences. Follow at your own risk.

OK so if the last couple paragraphs haven’t scared you away and you still want to build your own electrical system, this post is for you. I am by no means a professional but I have lived in multiple campers full time for well over a decade. I’ve installed solar and modified existing systems as well as built electrical systems completely from scratch.
The goal of this post is to give you some examples of what options you have for putting together an electrical system that is right for you. It will be broken down into 5 levels of capability and complexity based on the kind of traveler you are:
- Level 1: Weekend Warriors
- Level 2: Campground Vacationers
- Level 3: Back Roads Adventurers
- Level 4: Full-Time Van Lifers
- Level 5: Money Is No Object
With each levels, there will be a common base system where all the levels will be built from. We can first talk about what all of these levels will have in common by designing a simple but reliable and solid base system.
Building Your Base Electrical System
How much budget you have and how you plan to use your camper van will determine everything about your build. Because if you have an unlimited budget, you can certainly always opt for higher-end components which can potentially provide more capabilities. But before we get too carried away talking about the differences between different levels, here are the components that every build will begin with as the ‘base’ system.
- House batteries (AGM or Lithium) ($300-$3,600)
A house battery, sometimes called ‘leisure battery’ or referred to here sometimes as the camper battery, is where your energy will be stored to and drawn from. This is to make sure that the vehicle’s starting battery does not get depleted and cause you to be stranded. Depending on your usage, budget, space and weight allotment, you will need to decide what type and how many batteries to install. How to choose your battery bank and how much capacity to have deserves its own separate post. We will wait until that time to discuss it in detail. If you are wondering if now is the right time to finally upgrade to lithium batteries, we’ve got you covered. - Terminal bus bars ($50)
This is the place where the positive and negative terminals of your battery will be connected. You will want the wire coming from your batteries to be as short and as thick as possible. This will act as the central terminal where everything will connect to. You will need 2 of these bus bars. One for the positive wires and one for the negative wires. - Main battery disconnect ($20-$40)
Between the positive terminal of the battery and the positive bus bar, you will need a heavy duty switch to be able to quickly disconnect power from your system. This is for safety reasons in case you have a short somewhere or to service any part of the system. You might consider installing more than one disconnects so different parts of your electrical system can be shut off independently. For example, a main cut off can be installed at the battery while a separate on can be installed to disconnect the solar panels. - DC fuse panel ($20-$50)
Once your battery is connected to the bus bars, one of the main connections will be to the DC fuse panel. This will also need to use a short and thick gauge cable. Everything that gets power should come through this fuse panels so you can protect every circuit with an appropriately-sized fuse. - Switch panel or individual switches ($10-$50)
Some components will be powered from the fuse panel directly so it will always have power like the fridge or 12-volt sockets while others you might want to be able to turn off and on with a switch like lights and water pump. Some devices like a roof fan will have a switch built-in so you can just wire it directly to a port on the fuse panel. - DC fuses and circuit breakers ($50)
Depending on your fuse panel, you will need to buy a supply of the proper fuses. For components like a high-powered inverter, a circuit breaker might make more sense because it can have frequent power surges depending on what appliances are attached. These are inexpensive but a critical component for your safety. The bottom line is you can never be too safe it comes to your electrical system. Like fire extinguishers and band-aids, it doesn’t hurt to have them everywhere. The only downside of having too many fuses is it may take you longer to track down a blown fuse when you need to replace one. When installed correctly on the positive side of a circuit, always error on the safe side of having more fuses rather than less. - Copper wires from 2 AWG to 16 AWG ($50-$100)
The more power draw a component has, the thicker the wire gauge you will need to have. Keep in mind that if you are splitting power up to multiple devices at the end of a wire, you will need to combined the total amperage draw and size the wire appropriately. Consider using different color wires for easy identification. The standard scheme is black wires for negative and red wires for positive. Labeling the ends of wires after you run them to their appropriate locations can be extremely helpful when you need to work on them later. Consider using duplex wires which have the positive and negative wires insulated together in an outer sheath for simplicity and cleanliness. Stranded copper cable is the best choice for flexibility and load carrying capacity. Refer to these pages to make sure you are sizing your copper wires correctly. - Ring terminals, various connectors, wire looms and organizers ($40)
You will need a variety of wire terminals to connect wires to components, wire looms to keep them organized and chafe-proof and organizers to make sure they are tidy and snag-free. Things like electrical tape and heat shrink tubing are also musts to make sure all of the exposed ends are insulated properly and protected. As you are running your wire, always be mindful of sharp corners and rough edges that might chafe the wires over time and cause a short. - Roof fans ($120-$240)
One of the most useful appliances in a van is the roof fan. It is the most effective way to circulate the air in the van and also to make sure you are cool on a hot summer night and have fresh air when cooking a meal. - LED lights ($20-$50)
Lighting is an obvious must in a van build. There are tons of options when it comes to lights these days but the difficult part will be to decide what works for you. Read all the reviews you can and perhaps try to see their brightness and color temperature in person before you decide which ones to install. - USB outlets ($20-$40)
These days, USB outlets rule the world. From standard USB-A charge ports to powerful USB-C PD ports to charge items like computers, you are going to want them everywhere. You will never think you have enough USB charge ports around the van so install them everywhere. - 12-volt sockets ($25-$50)
The ‘cigarette lighter’ style outlets are still very necessary though I’d imagine very few people are lighting up a cigarette with them anymore. It will probably one day be replaced by something like smart USB-C PD ports but until then, you are going to want a few of these around. There are lots of devices that need 12-volt power and these are the easiest way to give it to them. - Battery monitor ($20-$200)
One of the most important things to take care of your battery is to not let it drop below the recommended depth of charge. The only way you will be able to do that is by having a battery monitor. They can be as simple as a volt meter to show you the actual output voltage of your battery bank, or it can be a sophisticated Bluetooth-enabled, shunt-based monitor that literally measures what is running through the wires and tells you exactly how much you are drawing at any moment and how much power you have left.
This makes up the bones of your electrical system that will power everything. How much you need of each totally depends on the layout of your van. You will of course need several different tools and useful gadgets in the build process. Some of these thing you already likely have in your tool box but some other items might be unique to this project. Here are a few items you may not have but should find access to before tackling this project.
- Wire stripper ($30)
- Terminal crimper ($30)
- Multimeter ($30)
So the base system can vary quite a bit in cost depending on how extensive you want your system to be and how many components like lights, fans, outlets you want to install. But the most expensive component by far will be the batteries. How many and what type of batteries are choices you have to make. There will be another post specifically on that choice soon. For now, here is the range of what you can expect to spend with and without the cost of batteries.
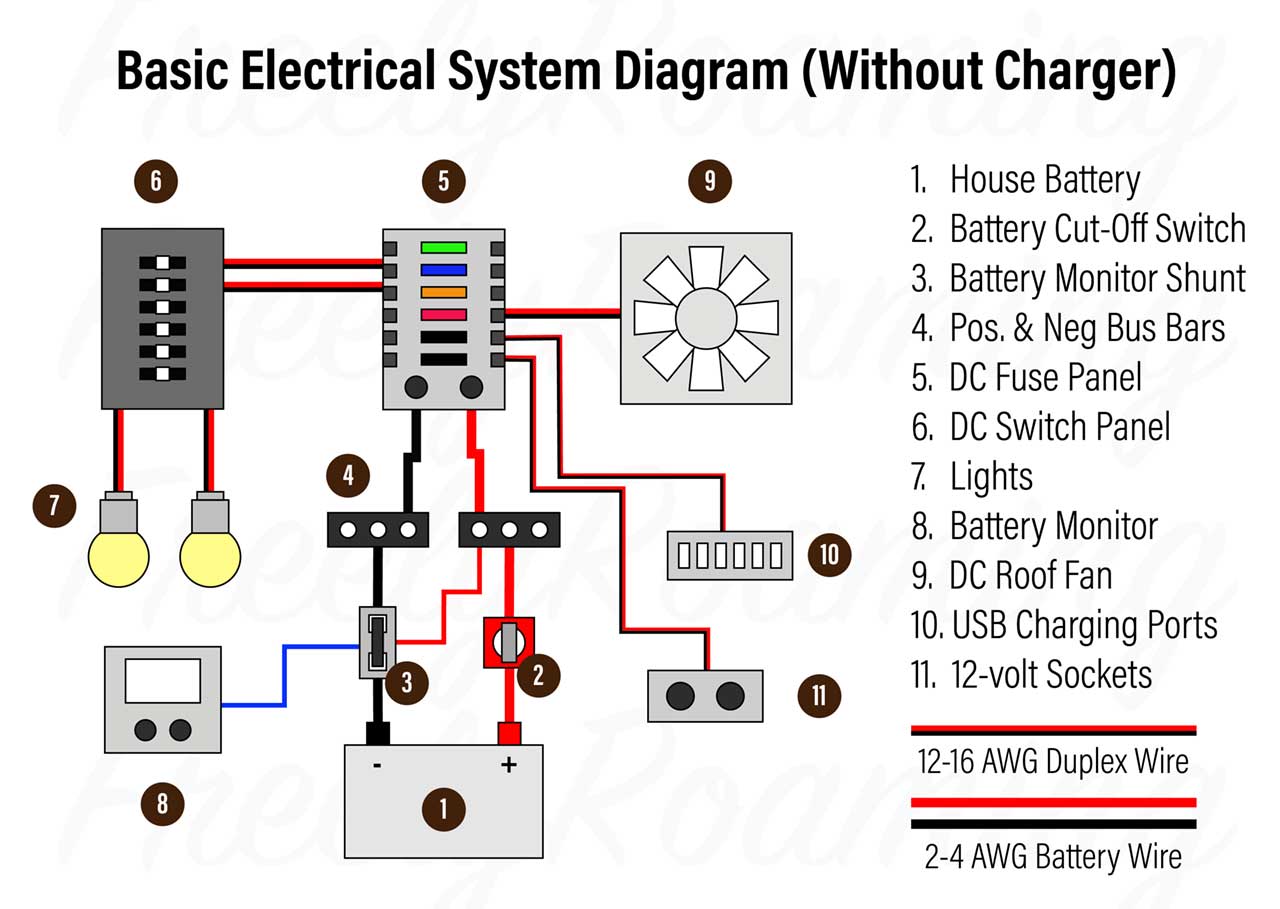
Basic electrical diagram (12VDC system) for your camper van build.
Cost without Batteries:
Low End Cost: $445.00
High End Cost: $960.00
Cost with Batteries
With a Single 125 Ah AGM Battery: $745.00
With a Single 100Ah Lithium Iron Phosphate Batteries: $2,160.00 (Woah!)
With a Three 100Ah Lithium Iron Phosphate Batteries: $4,560.00 (Ouch!)
(Learn more about upgrading to lithium batteries for you RV/Camper)
What Kind of Traveler Are You?
I don’t know if you’ve noticed but the ‘base system’ described above does not include anyway to recharge your battery bank. If you didn’t notice, you do now. It is actually an intentional omission. I didn’t include it because based on what kind of camping you plan to do, how you recharge your battery is where you can add or remove some major complexity and cost to your system.
If you are searching around the web for advice on the electrical system of your van build, you will certainly find lots of good information. But I think most of the really detailed ones go way too far for what is practical for someone who just plans to use it casually. This is why deciding on how you will use your van will really help to decide what you will actually need and what you can go without for now and maybe install at a late date if your adventures evolve.
Here are 5 basic levels of van campers and I think you might find one of these that best describes you.
Level 1: Weekend Warriors
If you are only using your van for short weekend trips averaging 2 -4 days, you can get away with a very minimal system. For just a few days at a time, you will likely be driving a couple hours at the beginning to your destination and your batteries will either be already charged from home or charging on your way to the destination.
Depending on what types of camping you like to do, you can even avoid adding a solar system to this build. Pretty much any system you are building should be sized to provide you at least 2-3 days of power without the ability to charge up. This is to assure that even when the weather is poor and the sun is behind clouds, or if you are in a densely wooded forest, you can still keep your fridge running and lights shining.
So in this type of a build, you should add a simple and inexpensive portable smart battery charger to your basic systems.
- Portable multi-stage smart battery charger ($100-$200)
A portable smart charger is perhaps the easiest way to keep your batteries charged. A great and popular option is the NOCO Genius series of smart chargers. They have multiple smart charging profiles for flooded lead acid, AGM, as well as lithium battery banks in both 12-volt or 24-volt configuration. With options to support as much as 500 Ah of battery capacity, it is a great and easy option to quickly get out on your first adventure.
Victron Energy Blue Smart IP67 12-Volt 17 amp 120VAC Battery Charger NEMA 5-15 (Bluetooth)
Alternate methods of charging, such as a solar system or alternator relay, is optional for this build but recommended if you have the budget and up for the task. But since you will be able to plug it in when you are back at the house after a couple of days , you can just keep your batteries topped off with your charger. Although having a passive way of always keep it charged will prevent your batteries from depleting too far and prevent premature damage.
Additional Build Cost Over Base System:
$100-$200

Level 2: Campground Vacationers
As compared to the weekenders, if you like to spend a week or longer at campgrounds with electrical connections, you will probably need to have a couple different components to add more capabilities. If you are planning on plugging into shore power most of the time, you will need in bring that AC power inside the van so you can charge your computer, run a blender and perhaps your coffee maker. Instead of a portable smart battery charger, a more permanent battery charger/converter might be what is right for you. On top of that, you will want some AC outlets installed around the camper so you can plug in whatever AC appliance you might be traveling with. An alternative will be installing a power inverter but we will talk about that at the next level.
So if this sounds like you, your build might include the following in addition to the basic electrical system detailed above:
- AC to DC battery charger/converter ($200)
- AC power panel with breakers, wiring, outlets and shore power plug ($200)

As compared to the weekender, the main difference here is the addition of an AC power system with the ability to plug into shore power. Solar or alternator charging is again optional but recommended for the same reason as above. The fact that you plan on being in campgrounds means you don’t have to worry about running out of electricity regardless of weather conditions as compared to being off the grid.
Additional Build Cost Over Base System:
$400

Level 3: Back Roads Adventurers
OK so now you are stepping up to a system that will need quite a bit more capabilities. In this scenario, you will need a way to charge up your batteries just about daily so you don’t run into a situation where you run out of juice. It adds a bit more complexity to your electrical system but the added capability is well worth the effort and cost.
In an extended off-the-grid adventure, you have basically 2 ways to charge up your batteries. You will need a solar system, an alternator charging system or both. A solar system will allow your batteries to be replenished as long as the sun is shining. An alternator charging system will charge if the engine is on. There are pros and cons to both but either one will do the job. It is best to have both and have more charging options. To learn how to properly match the amount of solar with the size of your battery bank, check out this article. Here is an example of the type of things you will need on top off your base build.
- Portable multi-stage smart battery charger ($100-$200)
- Pure sine wave power inverter ($100-$300)
- Solar panel, charge controller and mounts ($350-$1100)
- DC-to-DC battery charger ($200)


The big difference here is the addition of an alternate charging source. As mentioned before, a solar system, an alternator charging system or both will ensure you have the ability to charge while being off the grid. A pure sine wave power inverter instead of an AC electrical panel will allow you to have some of the conveniences of home without electrical hookups. But make sure to size your inverter appropriately based on the type of appliance you plan to use. For example, a high power blender or espresso maker can take upwards of 1,500 watts of power. With that much AC power usage, you will need to make sure the inverter is up to the task, your batteries are able to store and deliver the energy and your wires are rated to carry that amount of load.
As you can see, this is where your system will begin to look a bit complicated. The component prices can range based on how big of an inverter you need, how many watts of solar you plan to install and maybe increasing the size of your battery bank a bit. Keep in mind that even if you don’t get a bunch of solar panels to start, you should always plan for more capacity with a bigger charge controller in case you decide to upgrade.
Additional Build Cost Over Base System:
$750-$1,800

Level 4: Full-Time Van Lifers
So as compared to all of the other choices above, full time living in your camper van is a whole different story. The name of the game here is ‘versatility’.
As a full-time traveler, you will want to be able to charge your house batteries using as many different methods as you can. Solar, alternator, and shore power should all be there to make your life on the road easier. As compared to a part-time traveler, you will want know just how much power you consume each day. You will want to make sure you have more than enough capacity so when the weather turns sour and you can’t just turn around and go home, you can still comfortably sustain your mobile lifestyle.
So as you might imagine, your system is going to include pretty much all of the components mentioned above and then some.
- Portable multi-stage smart battery charger ($100-200)
- AC power panel with breakers, wiring, outlets and shore power plug ($200)
- Pure sine wave power inverter ($100-300)
- Solar panel, charge controller and mounts ($650-$1100)
- DC-to-DC battery charger ($200)
This setup is to basically combine both the capabilities of a back roads adventurer as well as a campground vacationer into one setup. The reason for that is you will inevitably want to stay at a campground at some point during your life on the road. Maybe you are visiting the beautiful but gloomy autumns in the Pacific Northwest or hunting for aurora borealis in the high latitudes of Norway, at some point there won’t be enough sun to keep you charged. With multiple methods of charging your batteries, it will make your life on the road much more sustainable.
Additional Build Cost Over Base System:
$1,250-$2,000

Level 5: Money Is No Object
So if you are trying to build the biggest and baddest electrical system and money is no issue, this is where you belong. Perhaps you want all of the conveniences of home and practically unlimited power, you will need to get your wallet open and be ready. Joking aside, electricity is one of the only things in this lifestyle that is truly renewable. Unfortunately, the storage density of electricity using today’s technology is a far cry from liquid fuels like gasoline and liquid propane. But if you want to use the least amount of fossil fuel possible and still be able to cook, cool and heat your camper, you can do it. The answer is lots and lots of solar panels and lots of lots of lithium batteries.
Because this system is going to draw a lot of power from a massive battery bank, you are most likely going to be running a higher voltage DC battery bank. Instead of running a traditional 12-volt battery bank, the ideal set up will be to connect them in series to 24 volts. By doing this, you can decrease the amperage and use thinner wires to power a large power inverter in order supply the AC power for all of these hungry appliances. You can and most likely will still have 12-volt devices like lights, fans and pumps in your system so you will need to install a DC 24v-12v step-down regulator. It adds a bit more complexity but not difficult to setup. Here is an idea of some items you are going to need to build such as system. Once complete, this system will look more like an off-grid home than a camper van.
- Hybrid Inverter/Charger ($1,600)
- AC breaker panel and outlets ($200)
- 600+ watts Photo-voltaic solar panels and mounts ($900)
- 400 Ah or more of lithium Iron Phosphate batteries ($4,800)
- DC-to-DC battery charger ($200)
- 24-volt to 12-volt step down regulator ($100)


As you can see, going completely electric without the need for liquid fuels is expensive. But I think it is great to not rely on fossil fuels to be as green as possible if you are up for a complex and costly build. These items will get you setup to have the capability to run an air conditioner, induction stove top and an electric water heater. All the conveniences of home with only renewable energy. Pretty cool, right?
Additional Build Cost Over Base System:
$3,000-$7,800

Which Level Are You?
These are your 5 levels of electrical systems for whatever the kind of adventures you might be building for. The best part about building your own van is that you can customize it to your exact needs. If you ever need to make any updates or improvements in the future, you know exactly how the work is done.

Arctic Circle, Finland (August 2019)
I hope this has helped identify how you will use your camper van and give you some ideas of what your build might look like. Do you fall under one or more of these categories? I am guessing you most likely are a combination of a couple types or perhaps have the aspiration to become one. If this has been helpful to you, I hope you will subscribe to our newsletter so you won’t miss more useful content just like this one coming in the future!


19 Comments
gdpetti · December 8, 2019 at 3:35 pm
Will Prowse has started to look at the ALL-in-One systems that you might find interesting.. as it’s so much easier, already combined, wired etc.. used for years by off-gid solar types… not perfect, but definitely seems much easier for most people. He came across them a few months ago, did a couple YT vids on them and has them on his other forum where people are using and commenting on them. You might find them interesting compared to the usual do-it-all yourself packages most recommend.
Dan Lin · December 10, 2019 at 3:04 am
Yes Will Prowse is a great resource on this topic. I plan to write a post about the pros and cons of all-in-one systems as well. It definitely has a place in the camper build for the right person. Thanks!
anna · October 20, 2020 at 5:34 am
this has been immensely helpful for rewiring my boat! thank you for all your diligence.
Dan Lin · October 20, 2020 at 6:43 am
I am so happy to hear that! Thanks for the feedback!
Geoffrey · November 4, 2020 at 1:23 pm
Hey Dan – Great article. I am new to owning a sprinter van and have a mind to build a weekender (Level-1-2) Do you have experience with something like the Bluetti EB150 1500Wh/ 1000W Portable Power? Zero fumes. I would rather not use the starter battery and thought I could get this to power all my devices but mostly to hook up a portable electric heater and some lights. Im still working on what heater to use but want to stay away from carbon emitting devices.
Dan Lin · November 4, 2020 at 2:59 pm
Thanks Geoffrey! I have a 500wh Bluetti power bank and I think the big 1500wh one would be great for a weekender. There is a new post called “DIY Electrical System vs. Portable Solar Generator” might help answer some of your questions. But I would say that using an electric heater is not really gonna work. If you are trying to heat the whole van, a small heater will drain that EB150 in an hour. Definitely will not last thru the night. Unfortunately energy density in batteries have not quite gotten to be good enough to use electric heat for a couple of cold nights in that small of a package.
JeremyJ · November 25, 2020 at 2:08 pm
Excellent article. Very very helpful. We are in process on our van as well and a heater is a must unfortunately since we are in midwest. We mostly do weekend trips and stay at campgrounds a lot of the time, but want to be able to boondock. Will level 2 or 3 be the way to go for us running a heater on and off thru out the night?
Dan Lin · November 25, 2020 at 2:23 pm
If you are referring to an electric heater then no. Electric heaters chew thru power like crazy. Much more than even air conditioners. I would instead spend the extra money and effort on installing a Webasto or Eberspacher (Espar) heater. They can be pricey but really worth it for reliable dry heat. There are Chinese clones that sell for a fraction of the cost but they won’t stand the test of time. Something will break in a year or two. But if money is tight, they can be a good alternative. Good luck!
Sam · December 10, 2020 at 2:09 pm
Hey, this is awesome, I just have one question: for 12-V appliances wired from the fuse panel, should the negative wires coming from the appliances go back into the fuse panel or to the negative bus bar? Does it matter? Thank you !
Dan Lin · December 24, 2020 at 2:08 am
i use duplex wires from the fuse box so negative comes back to the fuse box for a cleaner install. The fuse box is then connected directly to both the positive and negative bus bars with heavy gauge wires.
Harold Cambert · February 3, 2021 at 7:52 pm
Great article mate ! you almost convinced me that I am fully capable to understand it. Thanks !
Pete · June 8, 2021 at 3:04 am
Thanks so much for posting all this up with the diagrams. I’m upgrading my Hoopty (1981 Vandura modified by Brougham), originally had a house battery that could be charged by dc from starter battery (not a smart charger), and a shore power AC/DC distribution (Magnetek 6332 Converter). I got 3 solar panels, a charge controller, a 100ah battery and 800 watt pure sine inverter for free, so all I needed to buy was a dc-dc charge controller to get to level 4. Figuring out how to wire it has been my task, and this really helped visualize it. I’m not 100% but I’ll take it. Thanks again.
Rachael · January 21, 2022 at 4:55 am
Thank you so much for this post! It is perfectly laid out, easy to understand, and incredibly helpful! I have been working on my van conversion for a while, and with all the research I have done, and even growing up with a Master Electrician for a dad, this article finally helped lay it all out and clarified it in a way that helps me to actually move forward. I can’t tell you how thankful I am for this. Blessings to you and your family!
Dan Lin · January 21, 2022 at 5:08 am
Thank you Rachael, glad to be of some help! Good luck with your van build.
Cooper · November 25, 2022 at 3:30 pm
Thanks so much for this diligent and lengthy overview, Dan! Really appreciate it.
Everything You Need To Know Before Upgrading Your RV with Lithium Batteries – Freely Roaming · October 4, 2020 at 12:47 am
[…] thought this might be the right time to upgrade your camper? Perhaps you have decided which of the 5 levels you want to have for you camper’s electrical system but don’t know if lithium is worth the price? Well, you might be right. For a long time, RV […]
Building Electrical Systems In DIY Campers – Mali Mish · October 6, 2020 at 12:51 am
[…] 5 Levels of Electrical Systems for Your Van Life Build Project – Which One Are You? […]
How Much Solar and Battery Do You Need in Your Camper Van Build? – Freely Roaming · October 7, 2020 at 1:54 am
[…] part of your solar electrical system. You will need to choose the rest of the peripheral components discussed in this article. As of October 2020, you will spend roughly $350 to $400 depending on which charge controller you […]
Building the Electrical System for Our Sprinter Van – Mali Mish · October 8, 2020 at 6:26 am
[…] array of electrical options, we have written an article on our Freely Roaming blog that explains 5 levels of electrical systems for your own build that may help you better understand what you […]